So you’ve got the itch! It might be some music you recently heard that inspired you or a deep need to express your creativity in the form of sonic waves. Whatever the motivating factor, you will need some infrastructure to turn the inspiration into something more concrete and shareable. You’re in luck. These days there are more options than ever for audio engineering and computer music, and the cost of the equipment is falling fast. Although, some equipment can be quite costly, so it would be worth looking for something like DJ finance if you’re after expensive gear, like Pioneer decks for example!
Of course, a state-of-the-art studio with all the bells and whistles is what you have in mind, but it’s worth noting that even the best gear may only produce mediocre sounds if the engineer doesn’t have the skills to make it sound professional or note-worthy. Conversely, for minimal investment – say in some smartphone audio software – someone with skills and experience could produce a classic or a masterpiece. First, decide on your level and your ambitions, then build a budget.
Decide on Your Hardware
In the past, your music production hardware was somewhat limited. Most people went with PCs, Mac, or Laptops. But now, Smartphone technology is also in the mix with some of the most well known and established music production platforms available on mobile devices. We’re thinking of Reason, Cubase, Pro-tools, and Ableton. While this undoubtedly give us more choice about where and when to create, it also provides an extra headache when it comes to choosing a device to commit to.
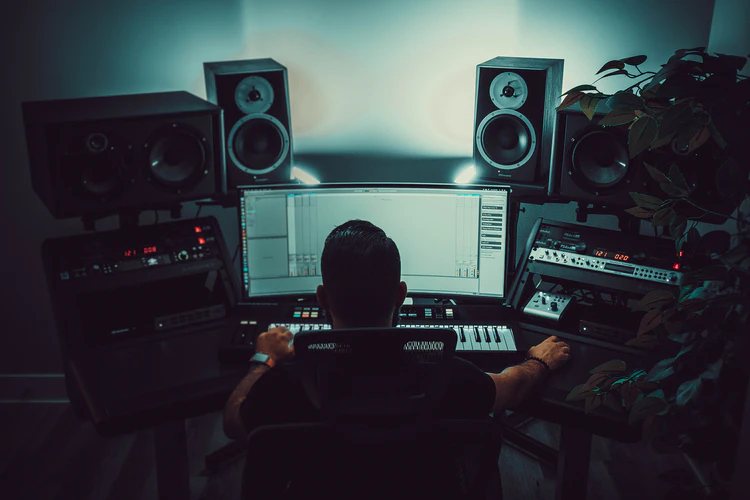
The first consideration is ‘budget.’ It’s amazing that cheaper production possibilities exist on smartphone devices, but obviously, the bigger and more expensive you go, the better the quality of the output. For beginner to intermediate music production engineers, a home studio of some description is advisable, but this will require some investment. It is not only the computer and software you will need. You will also need monitor speakers, a Digital Audio Workstation (DAW), and possibly hardware synths if you take that sonic direction.
Whether you work on PC or Mac, laptop or desktop will largely be a matter of preference. It makes sense to go with the hardware you feel most comfortable with since both brands offer the same or similar software options. Only consider Mac over PC if you’re committed to using ProTools, GarageBand, or Logic since these only exist for Mac. However, don’t let that swing you if you’re a Windows person; the options there are virtually indistinguishable. The only other possible deciding factor is in relation to your DAW since Macs tend to be thinner, sleeker, and easier to accommodate.
Decide on Your Software
DAW stands for Digital Audio Workstation; everyone is talking about it. It can refer to the audio software you run on your device as well as the integrated workstation you have set up in your studio. A workstation can include a sound desk, keyboard, synthesizers, monitor speakers, and other instruments – it could even include one of the best audio interfaces out there. Normally, however, this integrated workstation is organized around some centralized software for audio production installed on your Mac or PC. Popular software for this purpose includes Reason, Cubase, ProTools, and Ableton. Each of them has their own strengths and are preferred to some degree by audio engineers.
The DAW mentioned above are the big players in the world of audio production; they have been around for years and are well-established brand names. Despite this, there are more and more DAWs coming on the market, each with their own different slant and capabilities. Some of them are even free, which makes a massive difference when compared to the established brands. Others include Image-Line FL Studio, PreSonus Studio One, Cocos Reaper 6, and Cakewalk. The best DAW for you will be the one that’s most user-friendly for you.
But with so many available in the marketplace, how do you decide which is going to be the easiest for you to make music on? The answer is demos. Marketing professionals at these software companies have been savvy and forward-thinking enough to offer generous demo versions of their software to try out. It’s recommended that you do since investing in the platform is not just a monetary commitment. You will be investing your time and future skill set as you hone your craft to suit the software. Consider its sample-set, it’s usability, and it’s versatility, is it compatible with third-party software and external synths?
Use Monitor Speakers
In the beginning, you will easily get away with using HIFI speakers, especially if you are only trying out your software options. HiFi speakers will give you decent audio value for playback and checking sounds. Later, however, after you have decided on your software, installed it, and are busy recording tunes, it will be time for an upgrade. While HIFI speakers are adequate, they are primarily designed for listening, not recording. There is a big difference in this department.
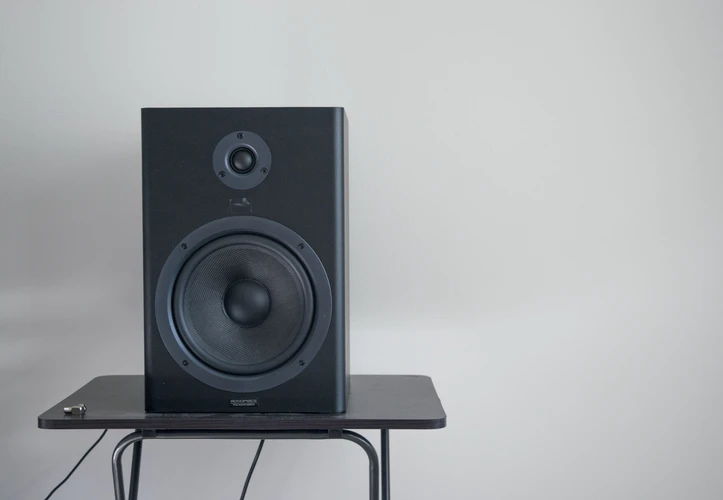
HiFi speakers are designed to amplify the bottom and tops ends of the audio for a better listening experience. This means you can easily manage the various frequency ranges, but they are all connected to a single amplification module. When recording, HIFI sound can be affected by high demand ranges such as the woofer or the tweaker. Monitor speakers, on the other hand, use separate amplification units for each individual frequency range. This means that no audio is compromised in the recording process. Essentially it means that the audio you hear from the speakers is the same audio that’s being recorded.
When you’re ready to upgrade to monitor speakers, there are many excellent models to choose from. The Yamaha Hs8 Studio Monitor is an industry leader, and for good reason. Their speakers suggest that they understand audio engineers’ needs with their pared-down design and accurate audio readings. The KRK Rokit 8 G4 Monitor is another excellent choice that has been a favorite for the last three decades. This professional monitor has been involved in the creation of many electronic hits you’ve heard played a million times.
Arrange a Dedicated Space
Many audio engineers at the late beginner and early intermediate levels underestimate the importance of a dedicated space for their audio production. It may be because of the impetuous need to create, or that fact that you’ve just spent a whack on software and monitor speakers. Truthfully, though, the dedicated space should not be set aside till later; organizing it early on will save many months of headaches and frustrations. Not to mention it will get your audio sounding professional sooner.
In your home, you should have one or two spare rooms to choose from. If you don’t, even a large cupboard is preferable to any kind of family space. The room’s dimensions will affect the sound of your audio creations, but only when they’re played through the speakers. When using headphones, the sound should be as you intend it. That said, the shape of the walls and location of your DAW will affect your output. Research the dimensions of your space and decide on the best way to set things up (always keeping the sound quality in mind). Remember, the dimensions of the walls can be altered using acoustic treatment.
Clear out the space so that it only contains a floor and some walls. This is the best starting point for considering what goes where. You need to stand in the middle of your room and monitor the background noise. Bring in your workstation, play some music through the speakers, and experiment with the acoustics for a while before settling on a long-term option.
Use Productivity Tools
You might think Productivity Tools refers to software in the context of this article, but it’s more concerned with the creative process and your workflow after you have your DAW set the way you want. Audio production is an extremely immersive process that demands hours of dedicated time lost in imaginative soundscapes. If this sounds appealing, a word of caution, it can also cause headaches and creative frustrations that can affect your mood and impact your relationships.
It can be useful to learn from successful business practices and apply them to your hobby to avoid any unwanted discontent. SMART goals stand for Specific, Measured, Achievable, Relevant, and Time-bound. They are business environments to track and monitor processes and get results. If you’re frustrated with a project or need to complete something for personal or professional reasons, consider applying SMART goals to your process so you can satisfy your inner or outer need for results.
Productivity Tools also include The Productivity Zone, the 80/20 Rule, and Energy Management, as opposed to Time Management. The Productivity Zone refers to what psychologists sometimes call ‘The Zone.’ It’s the state of mind in which you’re most productive and can be accessed fairly quickly using mindfulness techniques. The 80/20 rule is also used for business; it maintains that 80% of your output is generated by 20% of your effort. The trick is to identify and maximize that 20%. Finally, use Energy Management as opposed to Time Management. This will help optimize your productivity and sync you up with your 20% of Zone-Time.

![How to Get Rid of Ghost Touch on iPhone? [12 Effective Ways]](https://www.computerhowtoguide.com/wp-content/uploads/2023/08/iphone-ghost-touch-211x150.jpg "How to Get Rid of Ghost Touch on iPhone? [12 Effective Ways]")
