Computer How To Guide used to be a Blogger blog with the URL : http://computerhowtoguide.blogspot.com. Now it is a self-hosted WordPress blog with a new URL of : http://www.computerhowtoguide.com. Readers will be automatically redirected to the latter if they clicked on the old URL.
Moving from Blogger to WordPress
Today, I’m going to share my experience of moving from Blogger to WordPress in a step by step guide based on my own case in the hope that it will serve as a reference for those who are planning for such a move. This guide is a bit long and I will be separating it into Part 1 and Part 2. I assumed everyone who needs this guide is a newbie hence, I will try to explain every single step as detail and clear as possible. Let us begin.
[Read also : Blog Transition In Progress]
Purchase A Web Hosting Plan
Yes, you need to choose and purchase a web hosting plan. I took advantage of Cyber Monday 50% off promotion and purchased a 1-year hosting plan from HostGator. HostGator is one of the most famous and highly recommended web hosting providers around. If you are into self-hosting your blog, give HostGator a try and you’ll be amazed by the services they provided. They’ll even try to assist you in helping you to migrate from Blogger to WordPress.
Since there’s no more Cyber Monday deal, if you would like to purchase a web hosting plan from HostGator, use my Coupon Code to get a 25% discount.
25% discount Coupon Code : computerhowtoguide. Purchase HostGator web host here.
Purchase A Custom Domain
Your next step should be to purchase a custom domain. I strongly suggest you to purchase via the Blogger platform simply because it is fast and easy. Just log in to your Blogger, click > Settings > Publishing > Custom Domain
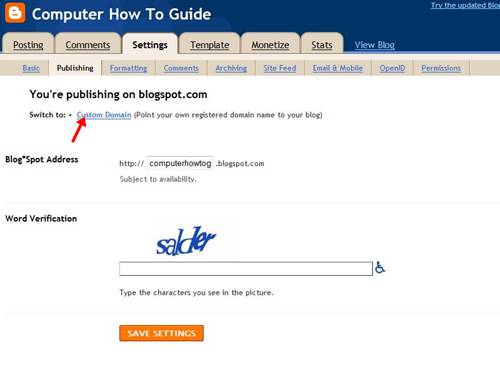
Login to Blogger
On the next page, enter your desired custom domain name to check its availability. I strongly suggest that you try to use the name of your blog as domain name if possible. If the domain name is available, you will then be directed to the payment page to make your payment, just follow the easy instructions from there onwards to enter all your payment details and get your new custom domain registered. You will then be charged $10 and your new custom domain is registered with Godaddy for 1-year. HostGator also provides custom domain registration during your purchase of their web hosting plan but they charge $15 for this. So use Blogger to register a custom domain if you would like to save $5.
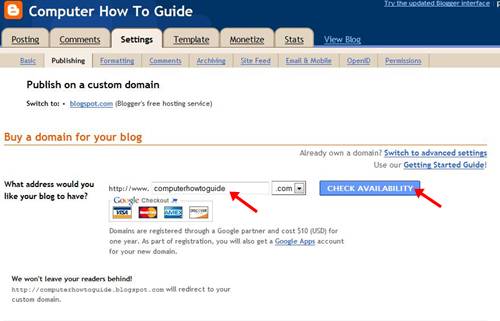
Purchase a custom domain
Access Google apps
Once you’ve done registering a custom domain, you will be sent an email by Google to allow you to access Google apps. Log in to your Google apps account and look for the link ‘domain names’ as shown in the image below. Click > domain names.
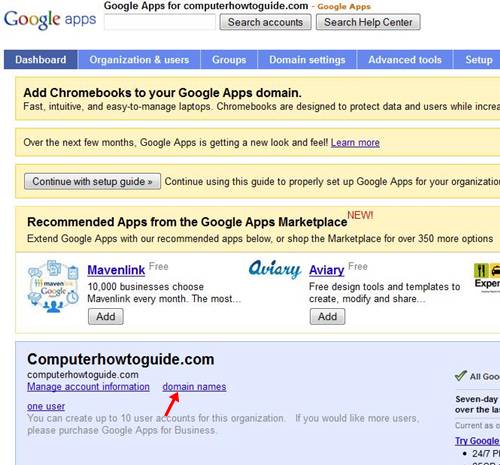
Google apps page
On the next page, click > Advanced DNS settings.
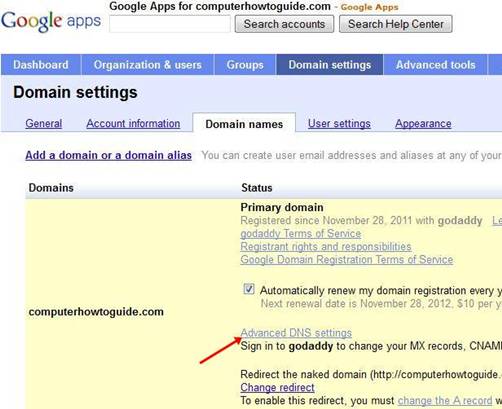
Click on ‘Advanced DNS settings’
After that, you’ll be brought to a page showing you your GoDaddy control center log in information. Write these information down and click > Sign in to DNS console. You will then be directed to the GoDaddy Domain Control Center log in page.
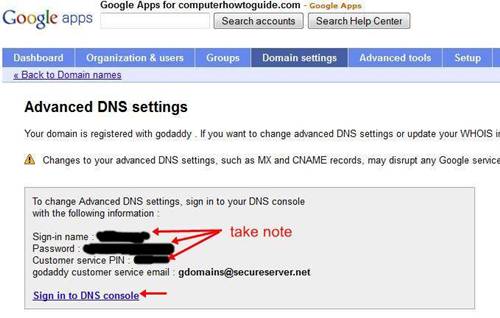
Click on ‘Sign in to DNS console’
GoDaddy Domain Control Center
Enter your Sign-in name and Password, log into your GoDaddy Domain Manager page and click on your domain name as shown below.

GoDaddy Domain Control Center
On the following page, click > Set Nameservers.

Click on ‘Set Nameservers’
Next, a Set Nameservers window will pop out. Enter the Nameserver 1 and Nameserver 2 details accordingly as shown below. Please refer to your web hosting service provider for details on Nameserver 1 and Nameserver 2. For HostGator users, you can easily get this details by logging in to your HostGator cPanel.

Redirecting your Nameservers
After entering Nameserver 1 and Nameserver 2, click > OK and your new custom domain will be pointed to your web hosting server very soon (although they said it will take around 24-48 hours, mine got pointed almost immediately). To double confirm if your custom domain has been successfully pointed to your web hosting server, you can go to Allwhois.com and enter your domain name to check. After clicking search, scroll down the output and look for ‘Domain servers in listed order’ (refer image below). If the the details matched the Nameserver 1 and Nameserver 2 that you’ve entered previously on Godaddy Control Center, this shows that your domain is now successfully pointed to your new web host.
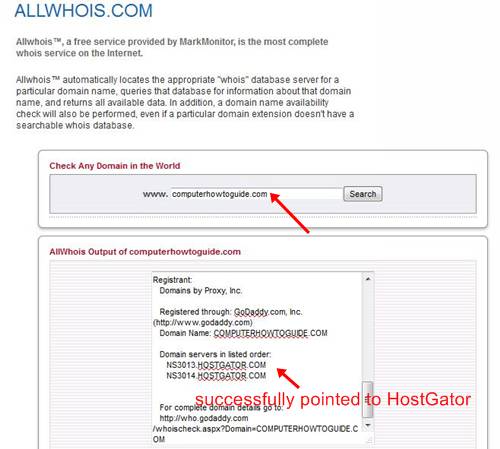
Confirm Nameservers using Allwhois.com
By now, you’ve got a custom domain hosted on your choice of web hosting server (in my case, HostGator). In the next article, I will cover the parts including installing WordPress, Export and Import Blogger, Plugin Selections, the obstacles that I’ve encountered during the transition, how to solve those obstacles and what to do with your Blogger blog after the transition.
Stay tuned for Moving from Blogger to WordPress : The How-to Guide Part 2.

Excellent :).
Stay tuned for Part 2 🙂
This is a very helpful article! It makes me want to move my blog and purchase my own domain even more. The only thing that’s keeping me from it is I’m scared to do it on my own (even with this helpful article) 🙁
I want to actually SEE and be with someone who can do it in front of me. 🙁
It really is not that difficult Mara. There were nobody sitting next to me to teach me while I was doing the switch. You just need to keep trying something new and take it as a learning process along the way and most importantly, enjoy it! If you’ve decided to switch to self-hosting in the future and face any problem, just drop a comment here and I will try my best to help you in any possible way. Glad that you dropped by and thanks for the comment. Hope to see you again in Part 2.
Thanks!! Hopefully next year I’ll be able to purchase my own domain and do the switch. Kinda scared I might click or do something wrong. 😐
You are welcome Mara. Self-hosting WordPress is a lot more powerful and flexible than Blogger, you won’t regret it if you made the switch 🙂
Clear post about how to change from blogger to wordpress. Now a days many bloggers moving to wordpress because we can find more features at wordpress. Thanks a lot for share this awesome post.
I have to say – I have two domains, and my other one (not Canadian Doomer) is self-hosted WordPress. I’m losing my mind trying to understand how to configure themes and make the darn thing do what I want. We might complain about the limitations of free WordPress or Blogger, but at least they’re easy to use.
I’d be definitely interested in reading more about configuring themes.
It all came to self preference in the end I guess. I started with Blogger and I like it mainly because it was totally free. But Blogger is not so SEO friendly, users need to do a lot of tweaks on the HTML code to make it SEO friendly. With self-hosted WordPress, most of the problem can be solved by just installing the appropriate plugins. Some plugins might do the job for you Helen, try to Google search the appropriate plugins and install it on your WordPress, and if you didn’t like it or the plugin failed, you can simply uninstall it. My personal opinion is, if you are just blogging for fun, use free hosting. But if you are looking to make it big, want total control and flexibility, self-host should be the choice. Thanks for the comment Helen.
What I really like in this article is that you were able to explain it thoroughly and clearly at the same time. With the clear instructions that you have here, there will be many users who will be utilizing this accordingly and will be able to follow it because of the way you were able to make this blog organize.
I shouldn’t use “The How-to Guide” in the post title as I think this is not the only way to do it. I should put “Personal Experience” instead, it’s more appropriate.. Never mind though, thanks for the compliment Liane 🙂
There are several similar articles, but all are bit difficult to understand and proceed. The first part is understandable and looking for the second part with confidence. Thanks!
Thanks JK.
Hi,
I thought this whole series was going to be about moving your Blogger Site over to WordPress, as opposed to “Self Hosting Blogger with your own custom domain. Then again, maybe I have to be patient and wait to read part 2.
Indeed it is Stephen and Part 2 is already up. Thanks for visiting.
Nice one dude ! That’s a good you thing you did that you have migrated to WordPress. It is more flexible and gives us more facilities to make our blogs more search engine optimized !
You are right Priyangshu, and I can say that’s one of the many correct decisions that I’ve made in 2011 🙂
Clear post.I so happy with this post and it so clear through screen shots.Thank you for sharing such a vital information with us.
That’s very detailed tutorial Peter! Great job! This would come in handy especially to newbies out there. I just wan to stress out that the most advisable and best hosting company is Hostgator. I like how their customer service deals with their customers and they are really quick with the solution of any problems that you’ll encounter.
Thanks for the comment Veronica.
WordPress is the most beautiful and easy CMS we have and you have very beautiful tell us how we switch from blogger to WordPress. I have one blogger blog as well now i will transfer it to WordPress.
I have all of my blogs on blogger. I wasn’t aware that they were not SEO friendly tho (I saw you stated it in a reply.) I tried wordpress but only the free and was not happy with it a couple years ago so I had never really thought about moving my blogs over to it. I know a few people who are now moving theirs over! 2 of my blogs have a purchased domain and the others all have .blogspot domains. This is very helpful for all who need to know how to do it. Keep us posted on your traffic increase and overall performance please-I may consider this
You should try it out on one of your Blogger blogs. You’ll notice the performance difference very soon. Thanks for passing by Dawn 🙂
I have tried to bought domain name from my blogspot account but they didn’t provide me the domain name I want because validation of my credit card was failed.So I had to purchase domain from bigrock.
Nice article.
Hope your blog transition went well Mr. Bhavesh. Thanks for commenting.
Hey Peter,
Did you noticed that all links from commentluv has been disappeared from all comments,is that any bug?
Thanks Bhavesh for bringing this into my attention. It appears that it was due to a plugin that I’ve used. It has been fixed now and the commentluv links are now back on.
+1000 to you for this awesome post. your post is much better than many other guidance on this topic. I don’t have neither Blogger, nor WordPress…but I’m going to create a blog about various beverages…here you described the major part I need…as Mara said, it’s a bit scary to register the domain name for myself, but I should try to do it.
thanks for this brilliant post.
I hope my experience in moving my blog from Blogger to WordPress could help those who will soon be making the same move. Thanks for the +1000 and your kind words Robert M 🙂
When I first started my hobby site – http://www.bikiniwaxvideo.org – I set it up using wordpress online. I then decided I wanted to purchase and set up my own domain name and site. The reason I mention this is because moving from one platform to the other was nothing short of an absolute nightmare – especially for a complete and utter noob like myself. The fact that you have authored and posted such an articulate and useful guide is going to save SO many people a great deal and times AND headaches! This is the reason I’m fast becoming addicted to this site – I’m yet to read a post that hasn’t been insanely helpful!
You should be remarkably proud!
Anita.
Thanks for the kind words Anita!
Super Tutotrial Peter. I bought a blogspot domain last week and now i want to move it from blogger to wordpress. 🙂
Thanks man for sharing this awesome steps.
You ‘bought’ a blogspot domain? Blogspot is free Amit, unless you mean you purchased a TLD for your blogspot blog 🙂
Anyway, good luck in moving to WordPress.
Excellent post and That’s very detailed tutorial peter.WordPress is the most beautiful and popular .Many people think like that but they don’t no how to do it. This was going to be about moving your Blogger Site over to WordPress.Thank you for sharing such a vital information with us.