
Hey there, tech-savvy friends! 🖐️ We’ve all been there - in the middle of some important work, and suddenly, your laptop keyboard goes rogue! It starts typing gibberish, messing up your sentences, and basically, just being a nuisance. But fear not, because today, I’m going to show you not just one, but TWO ways to disable that pesky laptop keyboard. Say goodbye to unwanted keystrokes and hello to smooth sailing! Let’s dive right in.
 Image by Racool_studio on Freepik
Why Disable Your Laptop Keyboard?
First things first, why would you want to disable your laptop’s built-in keyboard?
Well, there could be several reasons.
Maybe you’ve spilled your coffee on it (oops), or perhaps you’re using an external keyboard and want to prevent accidental key presses, or you just wanted to fix some simple laptop keyboard problems.
Whatever your reason, we’ve got you covered!
How to Temporarily Disable Laptop Keyboard
If you’re looking for a temporary fix, maybe just for the duration of a presentation or while you’re using an external keyboard, here’s how you can do it:
Step-1: Open Device Manager
- Right-click on the “Start” button (or press Windows + X) and select “Device Manager.”

Step-2: Find Your Keyboard
- In the Device Manager window, look for the “Keyboards” category and expand it.
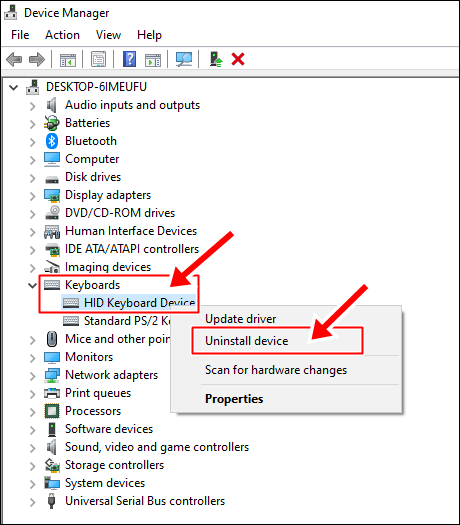
Step-3: Disable the Keyboard
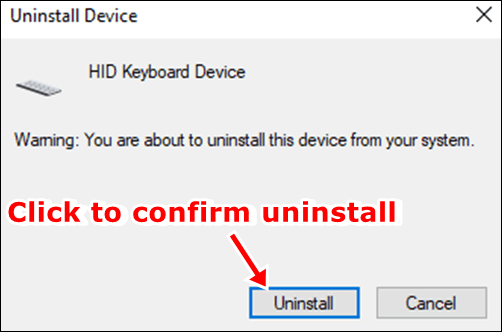
- Right-click on your laptop’s keyboard (it should have the word “keyboard” in its name) and select “Uninstall device.” Confirm the uninstallation.
Boom! Your laptop keyboard is now temporarily disabled, giving you the freedom to use your external keyboard without any interference.
**Tip: **
No worries! Windows will automatically re-install the missing drivers every time you restart your laptop.
When you’re ready to bring your laptop keyboard back in use again, just pop open the Device Manager window once more. Right-click on the keyboard, and this time, pick the “Enable” or “Install” option. Easy-peasy!
How to Permanently Disable Laptop Keyboard
Now, if you’re certain you won’t be needing that laptop keyboard ever again, you can go the extra mile and disable it permanently. Here’s how:
Step-1: Open the Run Dialog
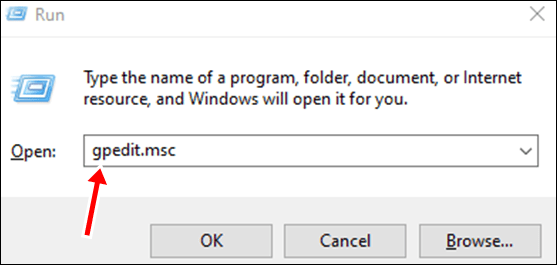
- Press the Windows key + R on your keyboard. This will open the Run dialog box.
Step-2: Enter Group Policy Editor
- In the Run dialog box, type gpedit.msc and press Enter. This will open the Group Policy Editor.
Step-3: Navigate to Device Installation Settings
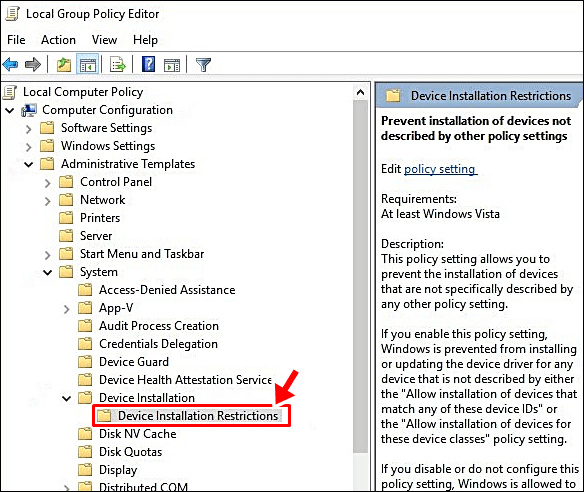
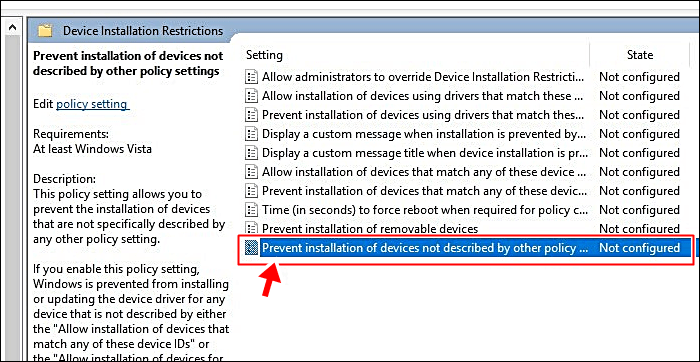
- In the Group Policy Editor window, navigate to Computer Configuration > Administrative Templates > System > Device Installation > Device Installation Restrictions.
Step-4: Prevent Device Installation
- On the right-hand side, find and right-click on the policy labeled “Prevent installation of devices not described by other policy settings” and select “Edit”.
- Next, select the “Enabled” option and click the “OK” button to confirm and save the policy changes. (See screenshot below).
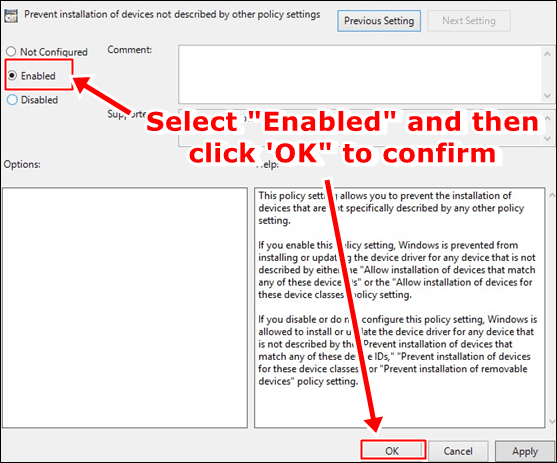
- This step ensures that the driver for the keyboard won’t be re-installed automatically during reboot.
Step-5: Go back to the ‘How to Temporarily Disable Laptop Keyboard’ Section Mentioned Earlier Above
- Now follow the steps where you do the temporarily disable keyboard method and uninstall your keyboard driver.
- Due to the policy settings changed above, this time your driver will not be automatically re-installed by Windows during reboot, hence your laptop keyboard disabled permanently.
Voila! Your laptop’s keyboard is now permanently disabled, freeing up space for other activities (or just giving your fingers a break).
Tip:
If you’re missing that good old laptop keyboard, open the Group Policy Editor again and reverse the changes you made. Then, give your laptop a restart, so that missing driver can hop back in on its own. Voila! Your keyboard will be back in action, just like the good old days.
Wrap-up
And there you have it, folks! Whether you need a temporary respite or a permanent farewell to your laptop’s keyboard, these steps should help you on your way. No more accidental keystrokes or coffee-induced keyboard dramas. You’re in control!
Until next time, happy computing! 💻
FAQs
Can I re-enable the keyboard if I change my mind?
Absolutely! Just reverse the changes you made in the Group Policy Editor. Restart your laptop, and the missing driver should automatically reinstall, bringing your keyboard back to use again.
Will disabling the keyboard affect my external keyboard?
Nope, your external keyboard will function independently of the laptop’s built-in keyboard. Disabling the laptop keyboard won’t interfere with the external one.
Is it safe to disable the laptop keyboard?
Yes, it’s safe. Just make sure you’re comfortable with your decision, especially if you’re going for the permanent option. If you have any doubts, consult your laptop’s user manual or seek assistance online.