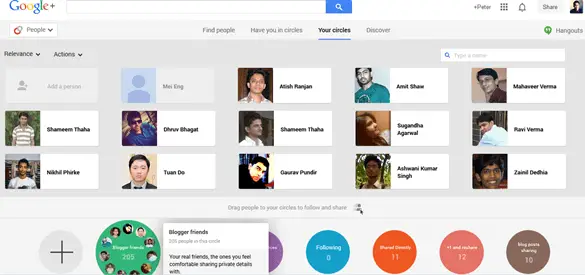
When Google launched its social network, it knew that it had to be different in order to compete with Facebook. In this spirit, they included a core feature called “Circles.” Instead of labeling every single connection as a “Friend,” with Google+, you are able to group the people you follow into categories of your choosing. The people you’ve known since kindergarten can be put in a circle called “Besties,” the people you work with can be called “Co-workers,” and the people you’ve never met in person can be put in a circle called “Only Know On the Internet.” (Some friendly advice: you might want to run a background check on the folks in the last category.)
While this feature makes it easier for you to share the right things with the right people, it’s important to know a few things before you dive in. Here’s how you can get the most out of your Google+ circles:
Getting Started
How you want to set up your circles is entirely up to you. You start out with a handful of labels (Family, Friends, Acquaintances) but you can slice and dice your connections any way you wish. Get creative. If a lot of your connections are cat lovers, you can make a “Cat Picture Connoisseurs” circle to make it easy to share your latest cat pics to an appreciative audience.
If you want to include somebody in more than one circle, go ahead. If you consider someone both a Co-Worker and a Friend, add them to both circles so they get the content you share to both groups of people.
Do Some Fine Tuning
You might love your Family, but you aren’t so interested in seeing every single hilarious picture they post on Google+. Thankfully, Google+ gives you the power to fine tune how many posts you see from each circle.
When you click on a circle stream, you will see an icon of a gray gear on the right hand side. Clicking on the gear will reveal a selection called “Amount,” with three choices: More, Standard, and Fewer. Choose “More” if you want to get every single post that comes out of that circle, and “Fewer” if you want to only occasionally receive an update.
[Suggested reading: How to Use Google+ to Improve Your Online Income]
Filter By Circles
Now that you have your connections nice and organized, you can filter them so that you only see posts from certain circles. Your circles should appear in the gray bar right below the search box. Click on a circle in order to see what those people have shared most recently.
Sharing Things
Every time you share something, you have to select who you are going to share with in the “To” field. If you want to share publicly, you have a few options
- Your Circles – This means the post will be seen by every single person in your circles.
- Your Extended Circles – This means the post will be seen by the people in your circles PLUS the people in their circles.
- Public – This means the post can be seen on everyone on Google+ (and consequently everyone on the Internet.) Only choose this option if you are a business or really want something to be highly visible.
However, if you want to pare down the number of people you share something with, then you simply include the name of the circles. What to share the hilarious picture of you jumping into a pool fully clothed with your friends? Just add the friends circle. Think Cathy from work will appreciate it too? You can add individual people in addition to the circles in everything you share. You can read this article for more ultimate guide on Google+ Privacy tips.
Happy Sharing
It takes a little bit of upfront work to really get the most of Google+, but the rewards are worth it. You’ll be able to send the information to the right people, see only the posts you are interested in, and share posts of cat pictures all day long without ever feeling guilty about it.
[Now read: Do You Like, or +1?]


Awesome info; many people just share their post to public assuming that it will be on timeline of all who are in their cicles. You need to specifiy every group before sharing your post.
Google plus is a great place to make friends and do business. The only thing is that it is bit more strategic and less noisy than Facebook, which is a plus. And unlike Facebook, in Google plus circles people add you to their circles to see your updates – not like some unknown person adding you to an unknown group without your permission.
Thanks for the tutorial Peter 🙂
Hi Jane,
Yeah that happens to me on Facebook. I would suddenly become a member of various Facebook groups which I didn’t join and this annoys me. I’m sure I’m not the only victim here. I’m a fan of Google+ and you’re right, the fact that it’s ‘less noisy’ makes it even more appealing, at least it is to me.
Hello Peter
Google plus is best place to grow Your Business Contacts & Real Friends, Bcoz not Much Fake Profiles in G+. and it is also a Best Sharing Place to share Your articles, You Shared a Great Article about Use of G+ Circles , i m here via You Article on G+ 😀
Thanks for stopping by, Sahil!
[ Smiles ] Peter, I am on Google Plus and I am still figuring out its features.
In spite of figuring out the features on Google Plus, I prefer Google Plus over Facebook.
Also, people adding you to their Facebook groups without your permission can be very annoying!